Pages

Every time you feel in God's creatures something pleasing and attractive, do not let your attention be arrested by them alone, but, passing them by, transfer your thought to God and say: "O my God, if Thy creations are so full of beauty, delight and joy, how infinitely more full of beauty, delight and joy art Thou Thyself, Creator of all!
- Nicodemus of the Holy Mountain

You can’t get to joy by making everything perfect. You can only get there by seeing in every imperfection all that’s joy.
-Ann Voscamp

Saturday, August 28, 2010

Horse Games

Last weekend Molly participated in the horse games at the county fair. I didn't do a great job of taking pictures of her, but I got a few. We had a lot of fun, she riding, me watching and volunteering a bit where needed. She's getting to be a good little rider!


Here she's participating in the egg and spoon game, where the participants try to follow instructions given them while ballancing an egg on a spoon. She placed third in that event. Klu was acting up a bit, and kicked at a horse who's rider came too close for his liking. Molly got big applause for keeping the egg on the spoon through his little tirade! :)


More egg and spoon.


Miss M with her ribbons! This was her second year in the games, and she did really well. First in one event, second in two and third in two. I don't care if she places in any of the events, but seeing her blossom as a young woman and a rider is so much fun!

Wednesday, August 25, 2010

Canning Pickles

Hey everyone! I'm back after quite a busy spell. I've got a lot to share from the weekend, the garden and canning pickles. Thanks to Mama Pea at A Home Grown Journal (thanks a TON, Mama Pea!), who gave me a ton of pickling cukes, I had a bunch of produce for some big batches to can! It was so much fun! It took most of the day to can three batches of pickles, so when Dan came home for supper at 6:00 I didn't have anything ready. He asked what was for supper and I said, "Ummm...pickles?" :)
My canner holds 7 quart jars, so I made 14 quarts of dill pickles. After that I was out of dill, so I made 5 pints of bread and butter pickles with the cukes that were left.
The dills are supposed to sit for 8 weeks before opening. I had one jar that didn't seal though, so what do you think we did? OPENED IT, OF COURSE! :) And they were good already. If 8 weeks improves them, I'd say the recipe is a hit!


Here's the giant pile of cukes I got from Mama Pea.


Cukes taking an ice water bath before canning. Soaking them in ice water for 2 to 8 hours is supposed to make them really nice and crunchy.


Here's the dill, habanero peppers (I put them in 4 of the jars to add some heat, for those who like it hot) and garlic.


Cukes packed and ready for processing.


Lots of pickles!

Saturday, August 14, 2010

Pulling Onions


The girls pulling Hattie and Dani's onions. The tiny plants next to the onions are chard and arugula.


Helping with the big onion patch.


Hattie and Dani hauled them in the wagon. Of course, pulling a carrot for a snack was necessary.


Two of the onions grew like garlic bulbs, with these little "onion set" like babies. I don't know yet why two of them grew this way. I'm going to have to look into it. There's so much that I don't know yet!


And here are a couple pics of the harvest. I've been using onions from the garden for a month now. It's so fun being able to go out and pull one up when you need it! Now I have to figure out how to store these away. I really don't have a cool dry place to hang them. I have no idea yet what I'll do with them.


I was getting a bit discouraged about the garden, and the onions were ready so I just had harvest them. I really needed something encouraging to do! The turnips will be next. Some of them are bigger than baseballs now. I'm thrilled with how well and how fast they grew. Too bad I didn't plant more of them. The tomatoes are really growing fast (the heat of the last couple weeks really had a dramatic effect). I don't know if they'll grow fast enough to ripen, but I'm thrilled they've gotten this far. Now I have quite a bit of space in the garden, but I don't know if there's anything I can do with it now, or if I should just leave it until spring.
That's all the info. I have now, but I'll try to post some pics of how things are looking soon.

Horsey Photo Shoot


Saddling up,


at a trot,


round the barrels,


beautiful partnership!

Friday, August 13, 2010

Reusable Canning Lids

Hey all!
About a week ago, I was thinking what a great thing it would be if there were still reusable canning lids. How great it would be not to buy them again and again. Well, a couple days later I finally got around to looking, and found these.

http://www.reusablecanninglids.com/

Has anyone tried them? This is definitely something that I'm interested in, especially if I ever get to be the kind of gardener that actually has something to can! Let me know if they've worked for you.

I'm sort of discouraged as far as my garden goes right now. There are just so many insects ready to devour stuff! I'm not one to run out and buy sprays to coat all the plants with, ecpecially sallad greens. I don't know that much about gardening at all, much less about how to get rid of insect pests in safe ways. Now that my second crop is starting to grow, I have baby arugula, chard, broccoli raab and beet greens. I would like it if they had even a chance, but they're only 2 inches high and already full of tiny holes. I need a good source of information on organic plant protection. Does anyone have any recommendations for me? Something that's fairly simple to understand, and that I can learn from quickly in my "spare" time? I'd love any information you all can give me!

Thursday, August 12, 2010

Goat Feeding Tutorial

This post comes hot on the heels of the previous one, so be sure to go back to see an explanation of why this is here.

Here's a fairly easy method to estimate hay needs for goats. I used it to estimate how much hay to get to last our animals 6 months (October through March). I'm starting out with 2 Dwarf Nigerian Dairy goats that will be bred when I get them.

You'll start with the estimate that your goats will eat roughly 5% of their body weight in hay per day. You will need more than this, however, since there is waste. How much waste depends on the feeding system you have in place. Using a hay feeder that keeps the goats from laying on the hay and keeps the hay off the ground should result in 10 to 20% waste. You could estimate 15%.

I'm estimating my goats to weigh a combined total of 160 pounds when I get them. My equation will look like this:

160 (pounds) x .05 (percent turned to a decimal) = 8 (pounds of hay per day)
8 (pounds of hay per day) x 180 (days in 6 months) = 1440 (pounds of hay for 6 months)
1440 (6 months hay) x .15 (percent waste turned to decimal) = 216 (extra pounds needed for waste)
1440 + 216 = 1622 pounds of hay needed for 6 months

I've been extravagant with the amount of hay I purchased because the does will be in kid and we will have two breeding pairs of rabbits who also eat hay. I also didn't realize that the alfalfa bales would weigh so much more than the timothy.
So, now I have 25 bales of timothy hay at 50 pounds each = 1250 pounds
15 bales of Alfalfa hay at 100 pounds each = 1500 pounds
Total of 3050 pounds of hay. According to "the formula" this should be way more than we need.
I'll keep you posted.

I also wanted to say a word about the hay I chose and why. There are a lot of different ideas about what to feed goats even among experienced goeat farmers. One practice is to feed only the leafiest alfalfa that you can find. Proponents say that this is the best food for goats, they grow quickly and are well maintained on this hay.
The other practice is to feed only grass hay. Some say that the animals need the longer fibers in this hay to develop and work the rumen properly. They feel that the slower but steady growth is better for the goats in the long run, proving to make their frame stronger, be more gentle on their internal organ development and create a stronger, more disease resistant animal.
I've listened to people talk about these ideas, and read a ton about this. I have no experience with it at all so far myself. Because I don't know yet how I feel about this, I decided to go with a middle of the road approach. Feed some of each. My plan is to give them a limited amount of the alfalfa (say, about four pounds between them) and them fill the hay manger with the timothy free choice. We'll use the alfalfa for the rabbits too. They will probably eat a few pounds a day among them all.
The feed I chose is based on some information I read at this very informative website http://fiascofarm.com/goats/feeding.htm . I did, however, run into something that said to NEVER feed your goats equine feed mixes just a second ago. Ok, so opinions very a LOT. The site above, which I've gone to for info a lot in the past said that you should use equine feeds since they contain selenium and copper, which the goats need. Pregnant goats especially need selenium, as a shortage can cause spontanious abortion.

Ok, that's all for now!

Oops! I forgot to report on cost here. This information will be accurate only for my area of the country though. I'm far from the city and also far from the farming communities here in MN. I chose to go through a trusted distributor, so it's coming second party and I'm sure more expensive than if I could get it straight from the person who cut the hay.

Timothy 50 lbd. bales $4.95/ea
Alfalfa 100 lbd. bales $11.95/ea
bedding straw $5.95/ea
Purina Horse Chow #200 50 lbd. bags $12.95/ea
egg mash 100 lbd. bags $17
scratch 100 lbd. bags $14.50

Wednesday, August 11, 2010

Hay Delivery Day

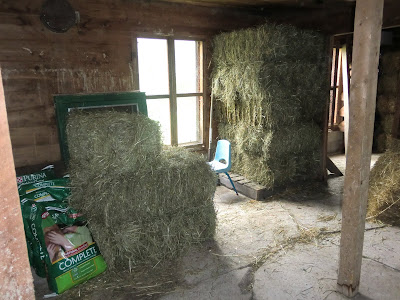
It was hay and feed delivery day yesterday. The kids and I helped unload and stack 60 bales of straw and hay and 600 pounds of feed. The bales ranged from about 50 pounds for timothy to over 100 for alfalfa. For some ungodly reason, we stacked the alfalfa last. Oh my, was I ever ready to die! For some reason, after we were all finished, I snapped a picture of my self after we were done. I was so embarrassed when I saw that picture! My face was SO red from the exercise and heat. The hay delivery dude saw me like THAT!? It's a good thing I've already got a great guy and don't have to impress anyone else!


Here's the hay on the truck.


We found a snug little cave where something had made a home in the straw.


Here's one pile of straw.


Alfalfa on the right and straw on the left.


Timothy (and there's more!)

I also got some 16 percent protein horse chow for the goats. All that hay and feed sure makes the barn smell wonderful! I just love the smell of horse chow. It's grains mixed with molasses and minerals, and it smells so sweet.

One on the things I'd like to do with this blog is help others to see how much it costs to raise livestock of different kinds and what can reasonably be expected as a return. Of course, there are returns that cannot be measured financially, like fresh air, exercise and satisfaction. However, I know that for myself, I tried so hard to find some clear information on how much it might cost to keep the goats, and how much feed and hay I would need, and it was oh so hard to find anything. I finally found an equation that would help me to get a rough estimate on what I would need for hay. I hope to share what I'm finding and what I discover along the way with anyone interested in trying to figure it all out. So, my next post is going to be a description of what I've purchased and the cost, and an equation to help anyone else who's trying to figure this all out. As I go along with all of this, I'll report on the outcome of the decisions that I made. See ya next time!

Monday, August 9, 2010

Garden Discription

A few people have asked me about my garden space, so here's the info for you, humble as it is. :)
My new garden space is about 10 x 40 ft. The one next to it that I'm using is about 5 x 30, so it's a huge improvement!
I also have a new bed near the house that's about 5 x 10. It has the squash planted in it this year, along with one unproductive tomato plant. That's all I could manage because I've been digging that one out with a shovel and removing all the matted grass roots and the rocks and loosening all the dirt for about 18 inches down, then adding rabbit manure. I basically got all of the edges done, and then dug 4 deep holes that I put compost in the bottom of for the squash. Next spring that will be ready for something special, but I haven't decided exactly what yet. An herb garden near the house? A strawberry bed? Hmm... The following picture is what it looks like now. So, next year I hope to be gardening in about 650 square feet. I'm immagining all the possibilities now!


Today I pruned the tomato and squash plants. Does anyone else find it hard to change gears like that? Just a month ago we were all rooting for our plants to grow, and now we're cutting it away? It always gives me a strange feeling to be cutting them back, but hopefully that will make the difference between tons of marble sized tomatoes and a few big, ripe ones. And maybe a squash or two? I'm still holding out hope! :)

By the way, thanks to everyone who reads and comments on this blog. It has really helped me to keep going on all these projects that I feel are important in so many ways. I immagine some built in accountability from telling others what I'm doing and what my plans are. Don't you find yourself more likely to follow through on something if you've told others about it?

Sunday, August 8, 2010

Horse Event and Garden

Molly and I went to a fun horse event yesterday. It was the Timex Three Event Day, sort of a mini version of the Rolex Three Day Event. Here are a few pics of our favorite riders and or horses.


Joel on Red, second place finisher at the event. He is also Molly's riding instructor.


Beautiful Gypsy Vanner mare.


Mary Beth on Easter, first place finisher at the event.


When I came home, I found that Dan had marked out the area for garden expansion. I am so thrilled with what he's planning! I think it's just about as much as I could handle for next year. Just enough to keep me from being completely overwhelmed!


The kids pulled a few carrots for a snack yesterday.

Saturday, August 7, 2010

Empty Nest

When I went out to peek at the goldfinches this afternoon, there were only two left in the nest. Then right before my eyes, they flew! Oh, it was a scary sight to see them land on the grass, alone and so vulnerable! I'm having visions of the future, when one day I'll perhaps leave my first born at a college somewhere and drive away, her looking as little and vulnerable as those tiny birds. Uh-oh, tears! I'm so glad I get to keep her in the nest for more than eight days! Six years seems pretty short though...


Empty nest.


The little darling! I should have taken a picture from farther away, so you could see how tiny they looked on that big lawn.


Goodbye, sweet little ones! Come back and build your nests here next year, ok?

Friday, August 6, 2010

More Garden Pests, and Goldfinch Update


This is one of my new babies! Isn't she cute? I'm so excited that she's finally here!


This is the mean, nasty beetle who's bent on keeping me from seeing any more little baby squash. It's eating around the base of the blossoms. One more thing to research. I only saw two of them, and I removed them right away. Wouldn't it be nice if that's all there were?


Here are the goldfinch nestlings 2 days ago.


And here they are today! I think any time now they'll be gone. How sad! They've been such good company for me while I hang clothes. It only takes about 8 days for the hatchlings to become fledglings! That's pretty quick growing up!

Thursday, August 5, 2010

Creme Brulee Fiasco

After reading about creme brulee on the Pioneer Woman's blog at http://thepioneerwoman.com/ , my little sis and I decided to make some. It didn't look so hard, after all. We were sure we could do it!


This is me and my little sis. She always stays behing me in pictures, making it look like she's tiny, and consequently I'm BIG! It's a conspiracy! Never mind that in reality I weigh 15 lbs. more than her. Any way, that's muscle! ;)
OK, so we decided that we had to get pretty before we made creme brulee.


Only being "prettied up" is very different for each of us. She was already beautifully dressed with her hair all coifed and wearing accessories. She needed make-up to feel beautiful. I, on the other hand, wanted to put on a clean shirt that didn't clash too horribly with my scarf that hides my messy hair. And brush my teeth. Clean teeth mean I'm set for the day, regardless of anything else.
It's funny about that. A friend recently commented that there's no way we both grew up in _ _ _ _ _ _ _ _ . But we did, really!


So, the creme brulee was a fiasco! It was my fault, really. I was in controll of the mixer. I mixed WAY TOO MUCH air into the custard. If you've never made it before, please remember NOT to do this. The custard was supposed to fill 6 ramekins. It filled at least double that. We had to find something else to put the rest in. This happened because I was so nervous about tempering the eggs. Next time, it will be much better. I won't make that mistake again.


Because it was so light and fluffy, the custard began to brown right away. It's NOT supposed to brown, just set nicely. It was also not very dense. It should be a lovely dense custard. It also fell after baking so there was yucky custard on the sides of each ramekin. That burnded dirung the sugar torching process (that we did with a propane torch of my husbands).


However, it was incredibly delish even after all the mistakes. I can hardly wait to do it again! Oh my, it will be heaven next time, I'm sure!

Monday, August 2, 2010

Homemade Tortilla Shells: an old family recipe

One of the things I do with fresh salsa is use it in these wraps. We usually have this for lunch. I wanted to share the recipe for these wraps with you. It's an old family recipe that belonged to my father's mother. She taught my mother how to make them, and I use this recipe a lot.


After mixing the ingredients, you should have a fairly thin batter that looks like this.


You use the back of the ladle in circles, starting in the center and moving outward, to spread the batter in the pan. You can see the lines I've left as I spiraled out.


Here's the finished tortilla.

This is very simple compared to many others I've seen where rolling out dough is necessary. They're light and contain some corn meal. I think the taste is way better than anything that comes from a grocery store. I hope you like them too!

The ingredients:

1 1/2 c. water
1 c. flour
1/2 c. corn meal
1/4 t. salt
1 egg
olive oil (or other) for frying

Mix the ingredients together.
Lightly grease skillet.
Pour 1/4 c. batter in skillet and spread with back of ladle.
Fry until edges are beginning to curl and top is dry.
Flip and fry additional 30 seconds.
Recipe makes about 6 tortilla's

To make these wraps, first fry yourself some tortilla's. Then scramble some eggs and melt cheese over them when they're almost done. Add some eggs and cheese to a tortilla. Top with some of that awesome homemade salsa you ladies make!

Stay tuned for the creme brulee fiasco!

Sunday, August 1, 2010

Fresh Bread and Goodbye Snow Peas

Yesterday I finally baked bread. I made 6 loaves. The first 4 were pilgrim's bread, and two of them I made into cinnamon swirl bread. The last 2 were brown bread. My brown bread recipe is one of Dan's favorites. It's good with jam, especially raspberry.


I'm really not sure what happened to the 2 loaves on the right. They're the same dough as on the left. The only difference is that the ones on the left are the ones I made into cinnamon swirl. I'm sure the taste and texture when baked will be fine, but I like it pretty.


The finished pilgrim's bread loaves.


All the finished bread. One of the loaves of cinnamon swirl lasted a whole 10 minutes. I guess this won't last a week!


And, I pulled the snow pea vines today. There were a lot of little green worms in them. I'm going to try to find out what they are, since I'm pretty sure they've eaten holes in all of my plants.

We ended our day yesterday with a trip to town for groceries. I found some heirloom and open pollinated seeds to plant in the empty spaces. It looks like if these grow we'll be ending our gardening season with some nice green salads! I decided on:
-white icicle radish
-broccoli raab
-chioggia beet (mostly for the greens, but perhaps we'll get some small beets before the cold weather)
-arugula
-chard

I'm going to weed and plant!

Happy Sunday, everyone! God's peace to you!